Though we don’t have a dog, for the last 13 years, a red, well-decorated doghouse has graced our front yard throughout the winter months.
I built it on a whim to enter a local contest while living in a townhouse. It was a tough competition that year as I eventually found myself up against a radio tower dawning strings of lights to form a 60-foot Christmas tree that could be seen a mile away. And then there was a replica of the Griswold house with its electric meter no doubt spinning to the electric company’s delight. The "Doghouse, located in the owner’s front yard,” submitted by a beagle, didn’t stand a chance.
Painted and decorated for Christmas 2009.
The 2009 finished doghouse painted red and decorated for Christmas. Garland hangs on the roof across the front and oversized lights adorn the top.
“Snoopy” didn’t win his eagerly sought-after 1st prize that year, or any year since, but that hasn’t stopped him from setting up his elaborate, annual holiday display in our front yard. Well, elaborate for a dog. I’ve managed to keep my displays small and simple but hopefully delightful.
Oh, yeah, I’m in the habit of referring to the doghouse display as if it were Snoopy’s. However, I’m the one who brings it out of storage every year so that he—I mean I—can decorate it obnoxiously with chasing lights, lit novelties, a wreath, and anything else that overdoes it. The only humble thing is the small twig of a “Charlie Brown” tree in front.
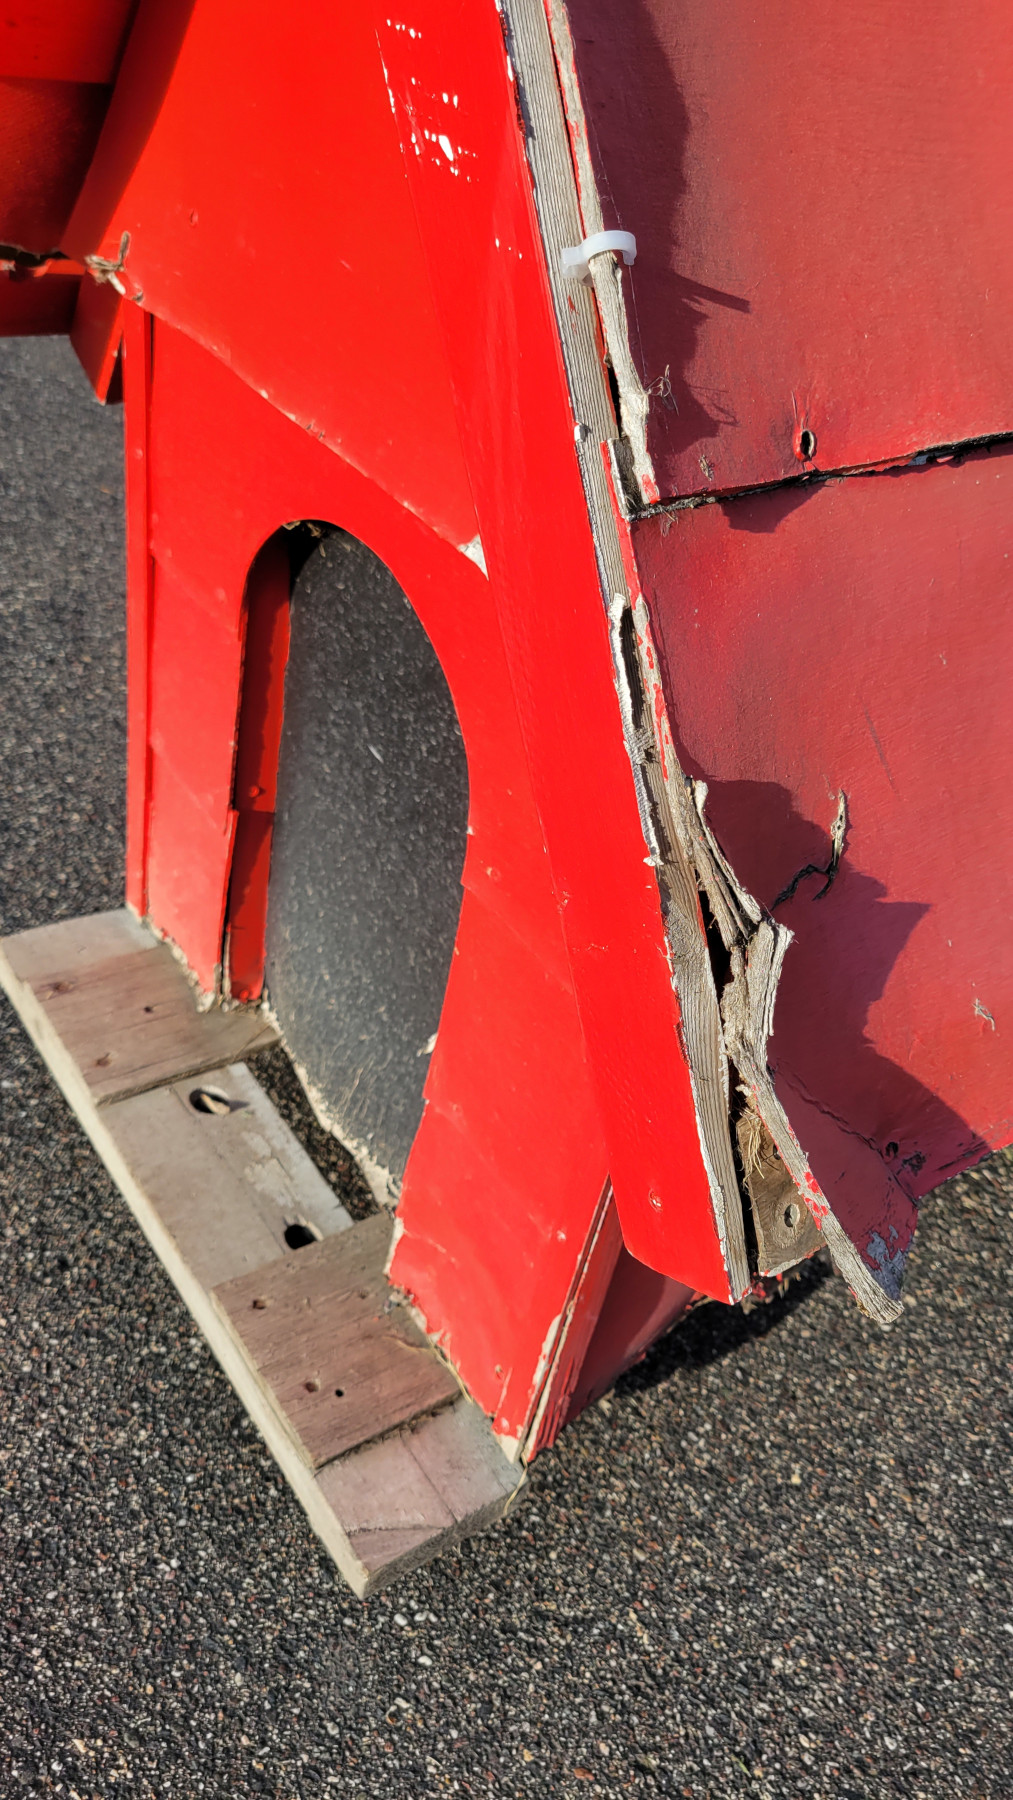
Well, as I said, it was built 13 years ago, in 2009, and for the last few years, has been in dire need of new siding and roof, which I had initially fabricated in Masonite and painted a classic red semi-gloss.
The doghouse after almost 13 years of wear.
A weathered doghouse. Siding and roof panels are warped and peeling.
Fun fact: In “A Charlie Brown Christmas” television special, the doghouse is blue, not the iconic red.
Masonite, of course, is not the best siding material, so I was surprised it lasted more than a few years. I did have the foresight to reinforce the roof so it would not sag and buckle under the weight of a good Minnesota snowfall.
Though the doghouse was originally built within a month, I knew I would need an early start this year as Snoopy had big plans to modernize his display. I, however, was concerned with bug and critter-proofing it during summer storage and giving it a durable roof and side that would last well into the next decade.
Starting in June, I tore it down to the frame and built a base covered in aluminum so Snoopy could store his decorations in the doghouse without worrying about water damage. I added runners to drag it through the snow and slid it onto a wheeled cart to roll it around the garage as I worked on it.
Stripped down to the original frame. You can see the original roof structure for withstanding snow accumulation. The roof was built to lift off so the doghouse could be moved and stored.
Roof and siding stripped revealing the wooden frame of the doghouse.
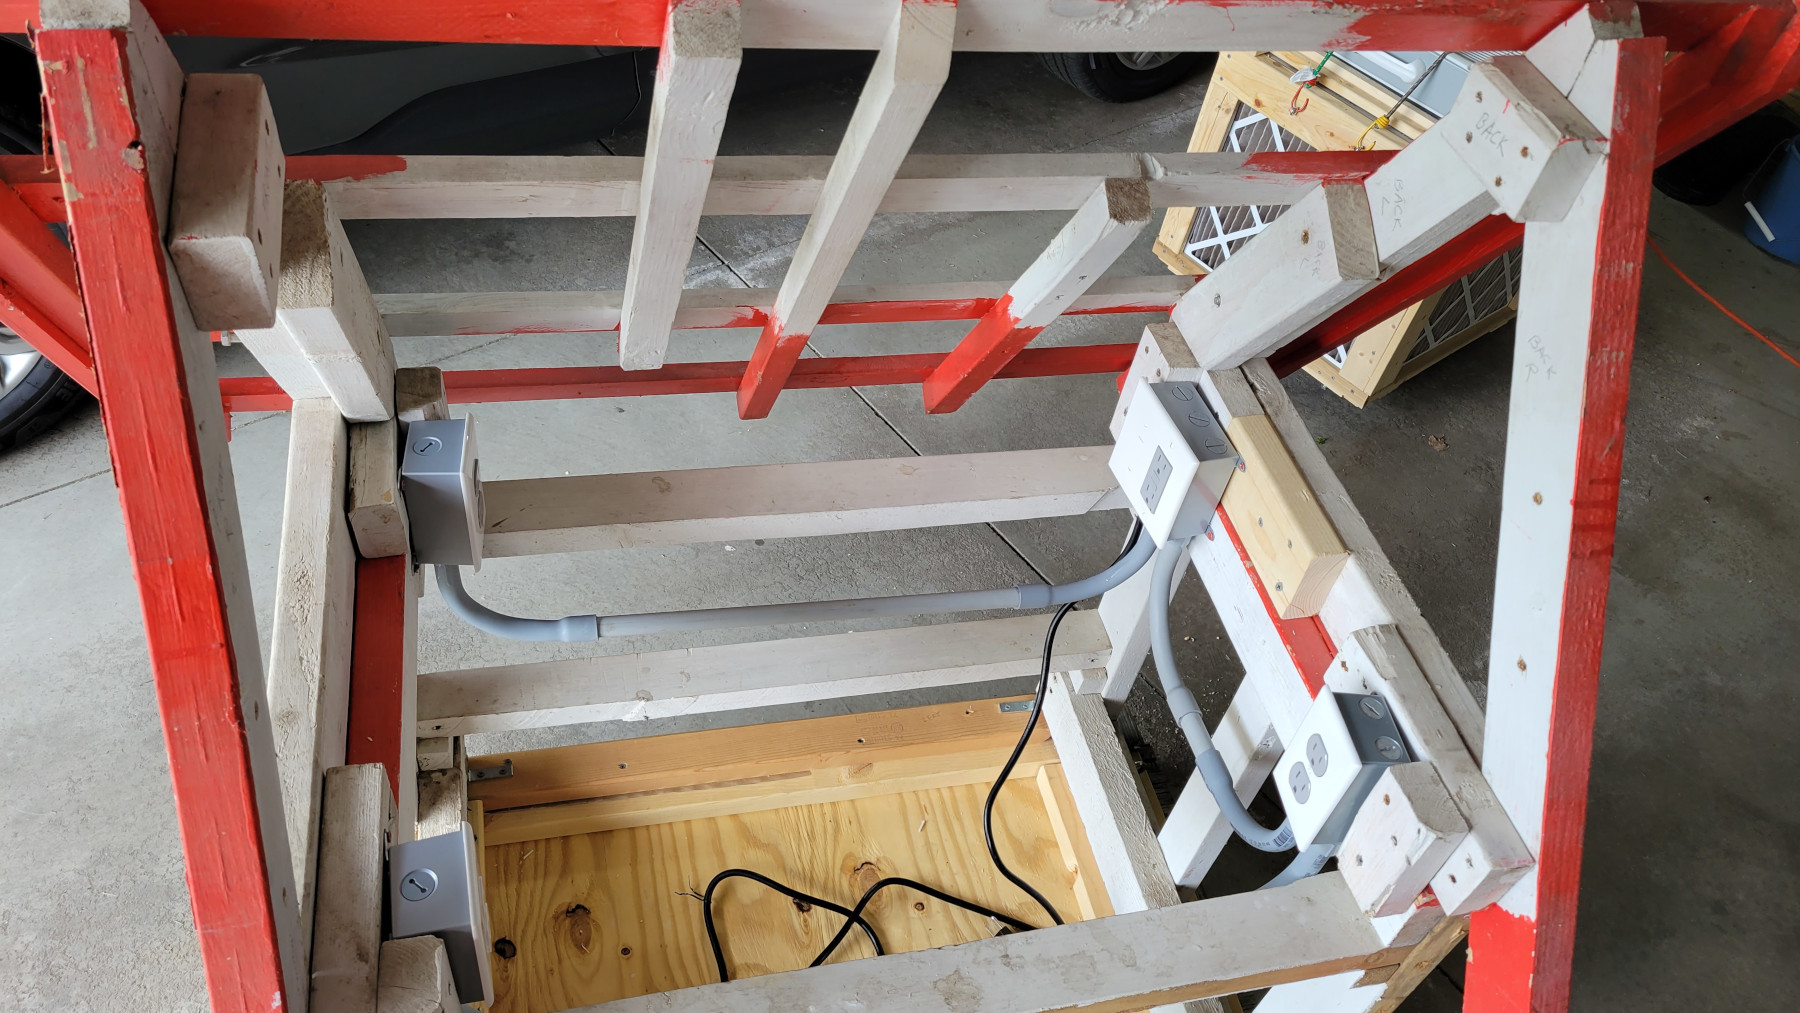
The next upgrade was adding electrical. Yes, the doghouse now has four outlets (GFI protected), so there is no shortage of plugs for all those tacky lights Snoopy loves so much. There are plenty of extra outlets for interior décor if Snoopy decides to sleep inside rather than on the roof.
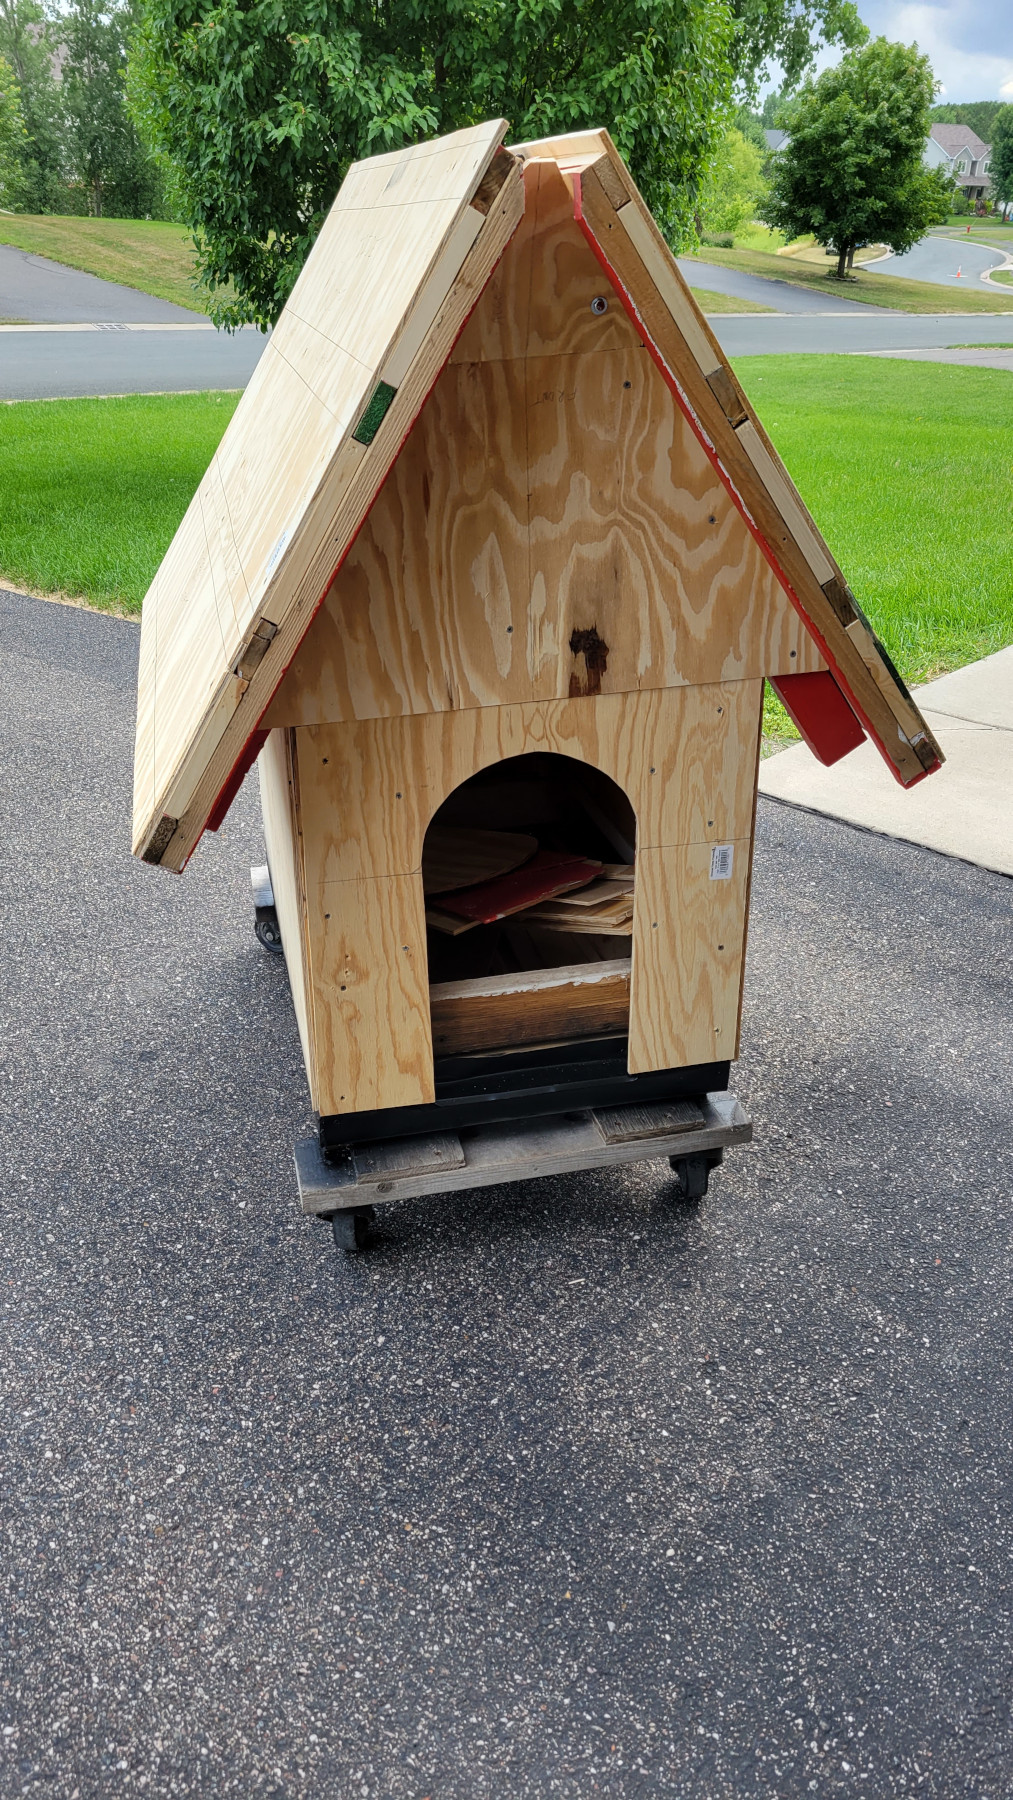
With a new base and electrical work complete, I then retrofitted a hinged roof. With the use of gate hinges, not just one but both sides open like the gull-wing doors of a DeLorean for style, or perhaps it looks more like a rebel X-Wing fighter to take on the Red Baron. Opening both sides allows easy access to the storage and electrical plugs inside.
Both sides propped open, resembling gull-wing doors or an X-Wing fighter. As I did work on the inside, I was appreciative that I ensured I would have access from both sides.
The open frame of the doghouse is shown with the two sides of the roof propped open, resembling a letter Y or X.
I sheathed the roof and exterior sides with plywood and, by August, began installing PVC siding, ensuring everything was tight so bugs and water would not find a way in.
By mid-September, I began painting it the custom red I had matched to a decorative doghouse back in 2009. The color match was no longer in The Home Depot’s color system, but luckily, I had kept the empty can with the code on the label.
Once painted, I stood back and admired the job, happy that I still had two months to spare before my tradition of lighting the day after Thanksgiving.
Painted! I used a custom red color that I matched from a decoration box back in 2009.
The doghouse is painted red with a black door.
Snoopy looked the house over, smiled, and then disappeared inside.
I thought the project was complete, but as packages started piling up at the front door addressed to Snoopy, I began to wonder what the old dog was up to.
Then one day, he pointed to a package with LED strip lights, handed me paw-drawn schematics and typewritten instructions, pointed to October 31st on a calendar, and dashed off to fight the Red Barron.
It was clear I was not done yet, and he was looking to start the display early by celebrating the Great Pumpkin this year.
The beginnings of a dog house with scrap wood. I took careful pains to calculate the proportions based on comic strips and other drawings. Luckily, officially licensed products were pretty standardized, with a 2:3 ratio for the sides I didn’t have to take any liberties. If starting over, I would have used 2x3s for framing instead of 2x4s.
Clamps holding two by fours to form a roof over a framed box
My apprentice. He’d later go on to build an elaborate two-level, five-room fort in our backyard from scraps reclaimed from construction dumpsters. I like to think this is where he got his start.
My 2-year-old son with a toy hammer inside the framed doghouse. He is looking up with a smirk through the unfinished roof.
With any project, at some point, you start to wonder if you built yourself into a box.
My 2-year-old son looking through an unfinished side of the doghouse. He seems trapped.
Finished frame.
The frame of the doghouse is complete. The roof has extra support for snow.
Original siding and roof with an almost 2-year-old to show scale.
My son standing beside the roofed and sided doghouse with a smile.
Proud builders.
My son and I standing beside the doghouse at night as it is lit. We are both smiling.
Remodel (2022)
I was surprised the Masonite lasted as long as it did.
Close up of weathered edges peeling.
The old doghouse didn’t have a base, and since I was going to use it as storage and it was going to house electronic components for the LED lights, I decided to make it weather-tight.
A plywood base with two by fours for connecting to the frame.
I put aluminum flashing on the bottom of the base. The seam will be covered by one of the two runners that would keep it off the ground. I sealed the corners with silicone.
The underside of the base wrapped in aluminum to prevent water intrusion.
Electrical installed. I installed four outlets (GFI protected), the main switch, and an electrical cord pigtail to plug it into the main power supply. It was all installed for a “Wet” location with proper boxes and conduit. The conduit does impede the storage area. If I had to do it over again, I would figure out a way to make the conduit flush with the sides to maximize the storage space.
Electrical outlets inside of the doghouse frame.
Originally the two sides of the roof lifted off. I decided on a different approach this time and installed a center beam with heavy-duty gate hinges so both sides could lift.
A view down the center roof line of the doghouse revealing six large hinges for the roof panels.
To keep the sides open, I used the old facia boards. Using two props is better than one. It relieves stress on the hinges and prevents a major accident if one should accidentally get knocked out. I speak from experience and was grateful I had two.
A roof panel is propped open to show how access can be gained to the inside of the doghouse display.
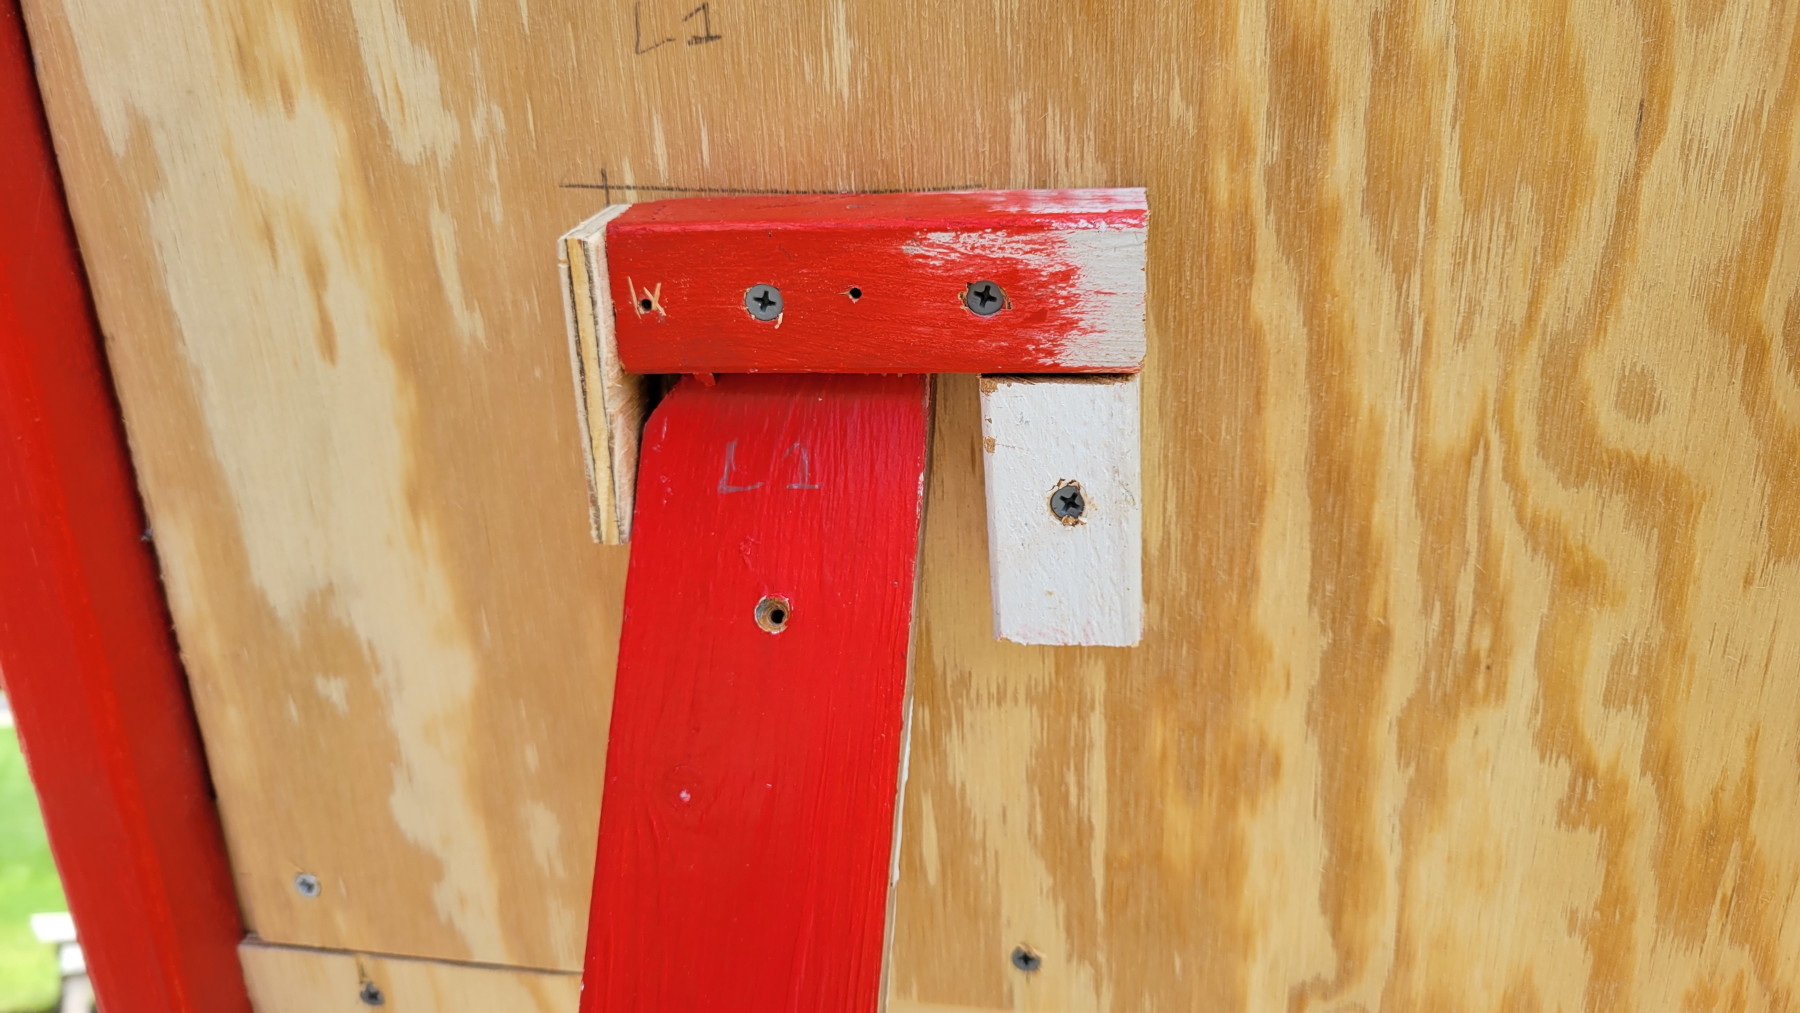
I made sure to add blocks to either side of the prop holder to prevent the prop from slipping out.
A roof prop is shown secured with blocks on the underside of the roof to prevent slipping forward or side to side.
Plywood on and ready to side and roof! I had kept portions of the old siding, such as the doorway arch, so that I could use it as a template.
The doghouse is completely covered in plywood with the doorway arch cut out.
For ventilation, I cut 2” circular holes into the bottom of the roof. To keep the bugs out, I glued on the window screen.
Eight two-inch circular vents are shown with window screen glued in to prevent bugs from getting through the holes. A tube of Devcon Home WeldIt glue is shown beside them.
Close-up of window screen glued to the inside of the soffit vents.
A two-inch circular vent with screen glued in place. The glue is around the edge securing the screen to the vent.
Siding, roof, and trim cuts. The siding was cut into 9-inch wide strips, and the roof was cut 11-inch wide, both from the ¼" PVC panels. I allowed 1-inch for overlap on both the roof and siding. The corner trim was all cut the same 1½” width because I was installing an LED aluminum channel in the corner. You would, of course, need to overlap if you are not installing a channel.
Roof, siding, and trim panels are stacked on top of a saw horse.
½-inch thick corner pieces with brackets for LED light track. Note that the channel is ¾ inches deep, which also required the ¼-inch underlying plywood not to meet in the corner.
Corner piece trim is fastned together with angle brackets that will secure the corner LED channel.
First pieces installed! I started with the corners, then added the inside of the archway. With those in place, I added a flat base which the clapboard siding would start from. I used a white silicone hybrid to adhere the PVC to the plywood, PVC glue (regular PVC plumber’s glue) to adhere the PVC to the other PVC, and then a minimum number of screws to secure it to the plywood. The siding and roof pieces had a 1-inch overlap.
A few pieces of trim have been added to the doghouse along the bottom and in the corners. The LED corner channel can be seen.
The roof came together, and to provide swing room for the hinged sides, I cut a notch at the very top. This would be covered by a top piece later.
The front facia is attached to the doghouse and meets at the top where two notches are cut out.
The roof and sides are complete! I filled the screw holes with Vinyl filler and calked any seams with white silicone. I left a ½-inch space at the bottom edge of the roof for an LED channel and a ¾-inch groove along the front and back edges for a channel as well.
The roof and sides paneling are on the doghouse. Unpainted, the doghouse is white.
I would build a flat piece to top off the doghouse later, incorporating LEDs to “top it off” and provide Snoopy a place to sleep.
The doghouse is painted red with a black door.
I am a completest, so of course, I painted the inside of the roof. Plus, I wanted to show off the hinged access again. The holes are for the vents. Both sides of the roof are paneled with vents and spacing for airflow and wiring access.
The painted doghouse has its roof propped open.
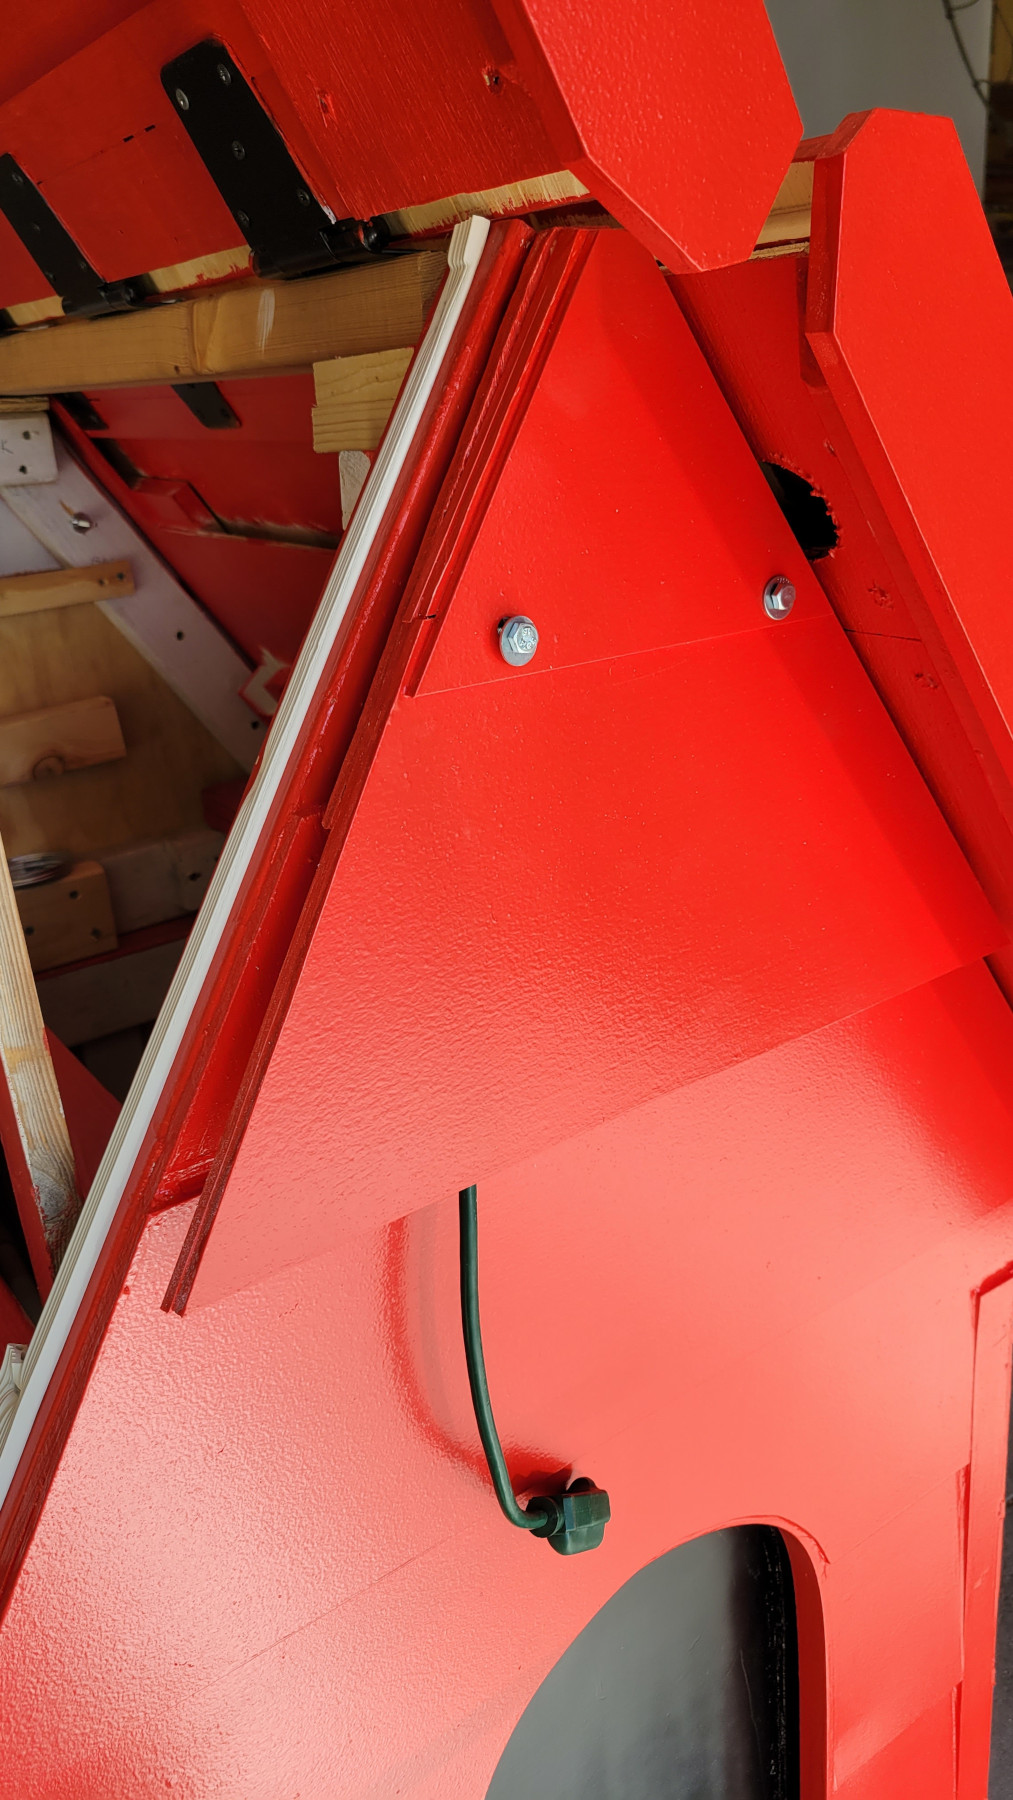
I built in an access panel in the front and back so I could run wires through to accessories. You can barely notice when I tuck the cords to the side.
An access panel on the front is shown. A cord is hanging from the bottom. The access panel blends in with the clapboard siding which hides it.
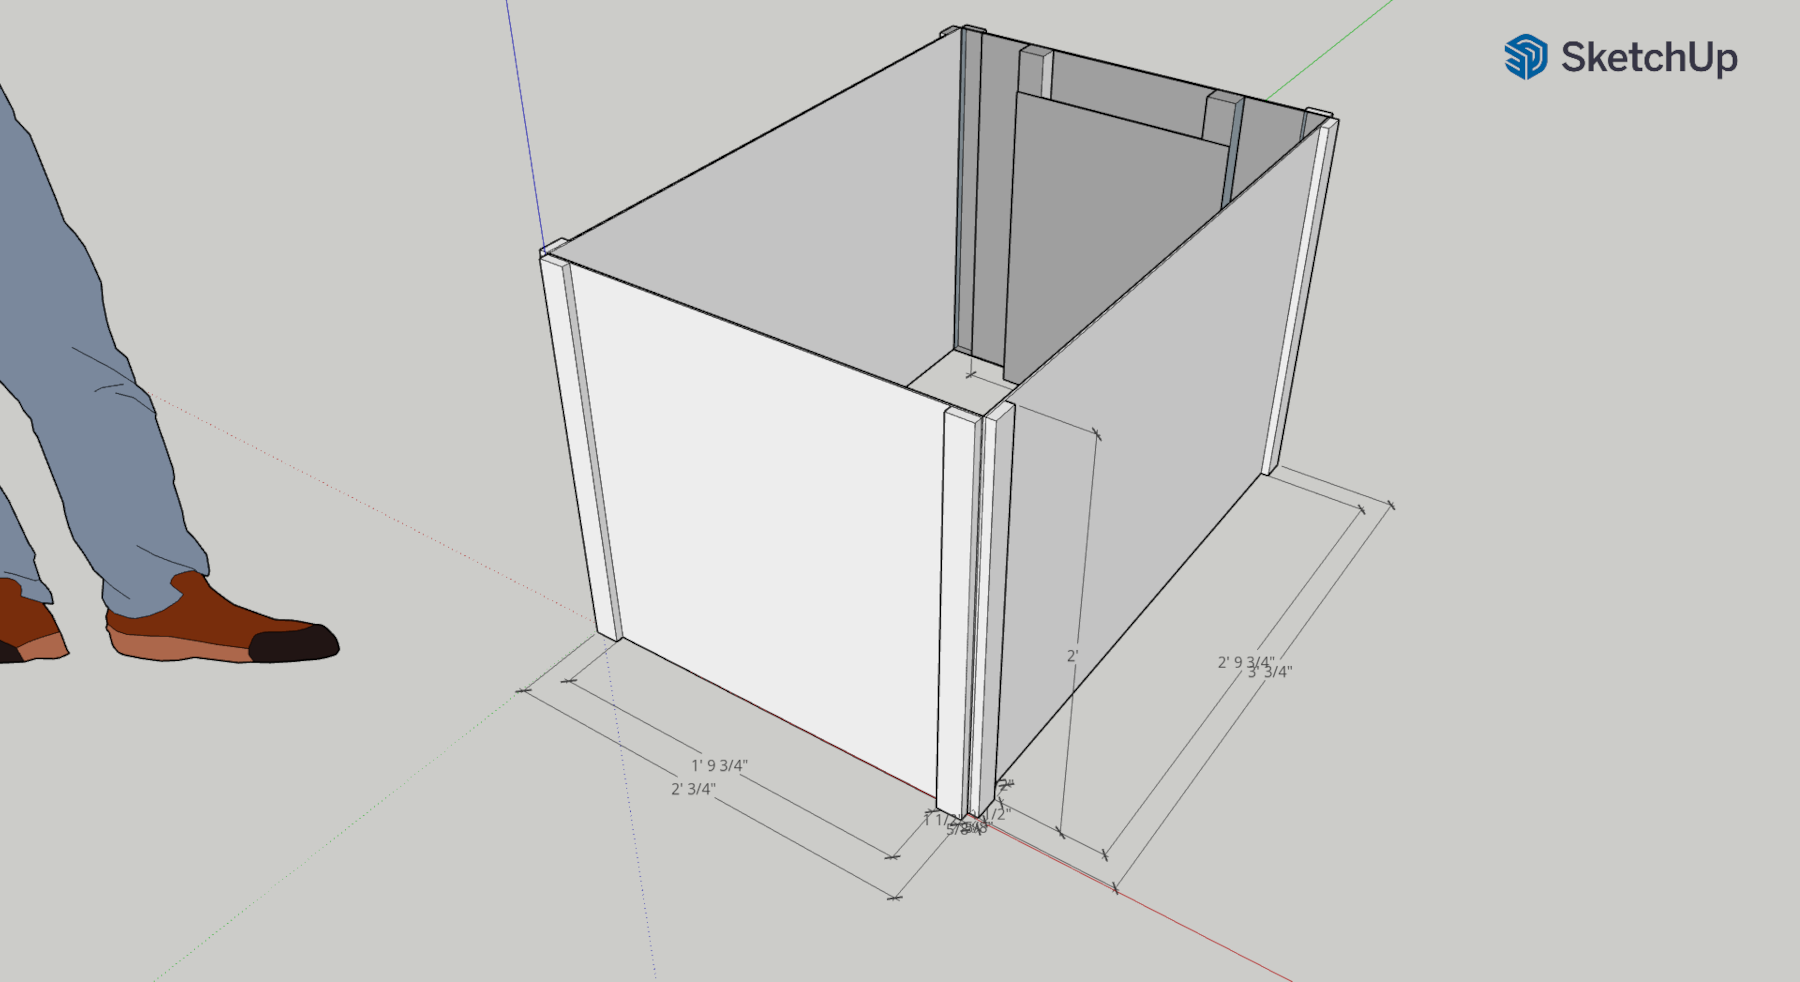
These diagrams don’t include the base, which gives it a few more inches. And when working on or storing the doghouse, it is on a wheeled cart which makes it a little higher.
A computer sketch of the bottom box of the doghouse with a man behind it showing scale. The roof is not shown.
The clapboard siding is not shown here, only the base plywood and corner trim. With the ¼" clapboard siding installed and overlapping, its bottom edge is flush with the ½" trim. I made sure 3 clapboards were visible on the side and roof, as depicted in the cartoon. There is a fourth piece just under the eaves to finish it out.
A computer sketch of the bottom box of the doghouse showing it is 3 feet long and 2 feet wide. The roof is not shown.
To provide room for a corner LED channel, I used the ½" thickness of the trim and the ¼" plywood sheathing to account for a ¾" deep corner channel for LED lights.
The corner of the doghouse has a groove to allow room for LEDs. The trim is 1 1/2 inch wide and 1/2 inch thick.
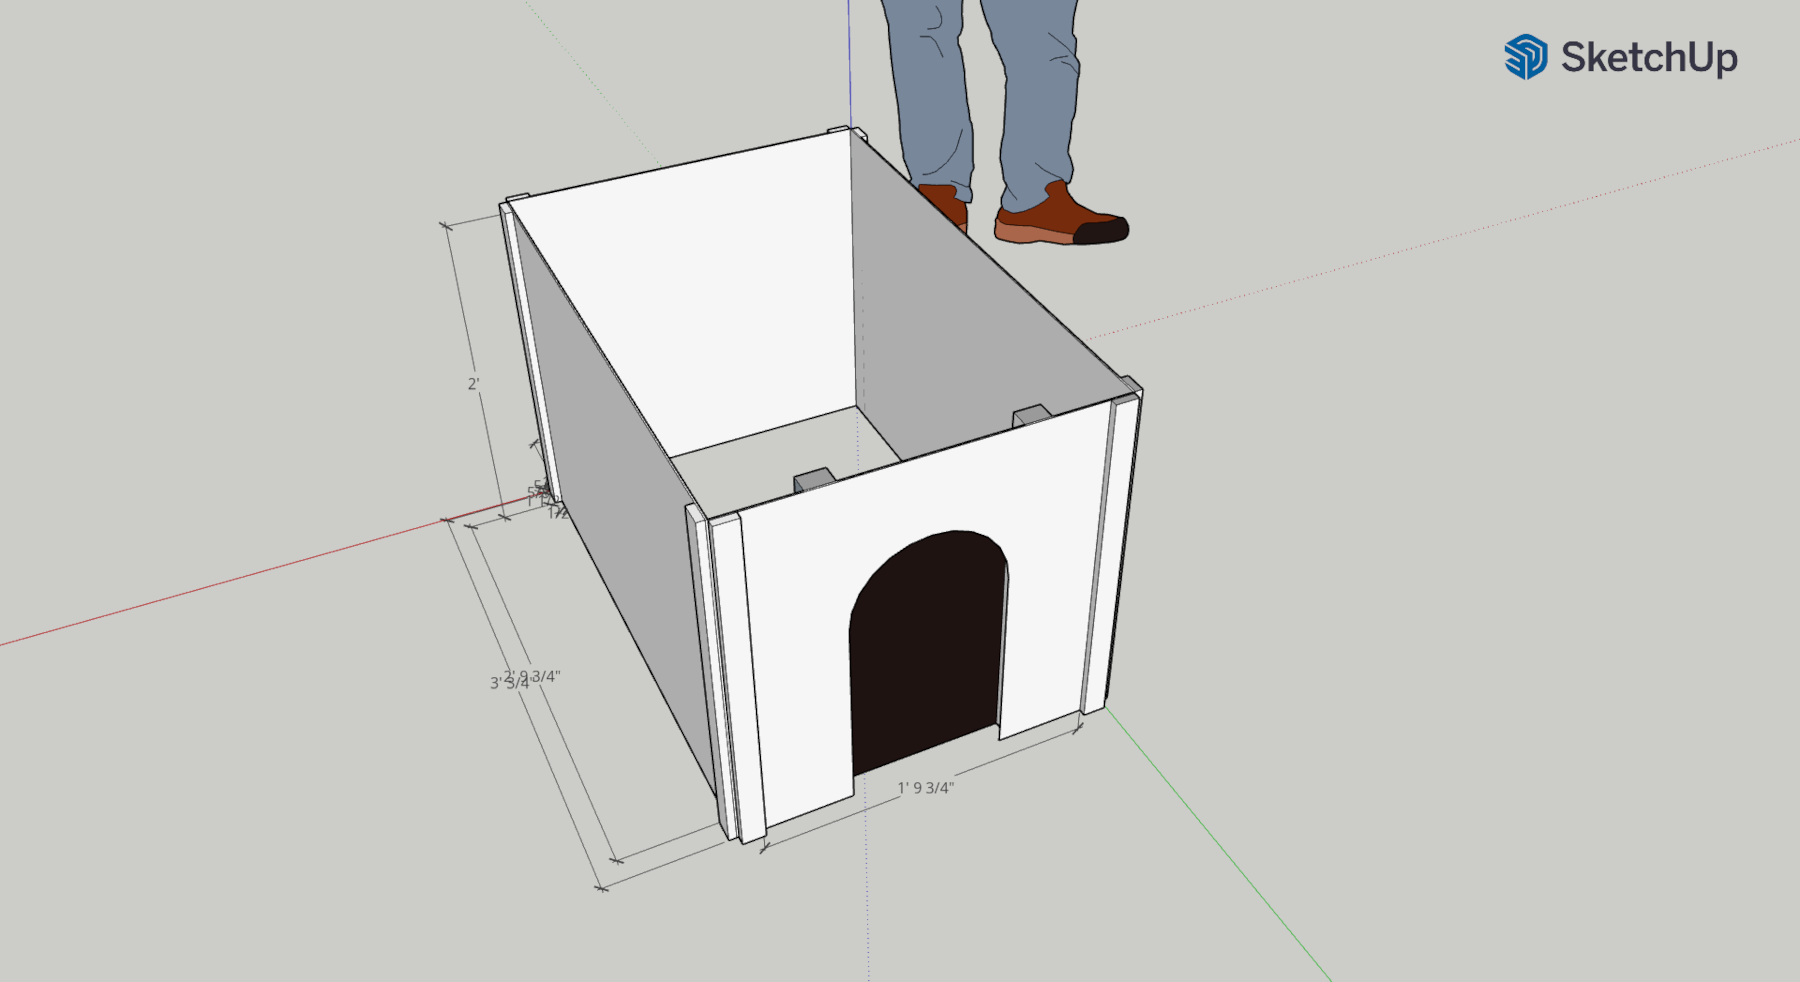
Another view from the front showing the door arch.
A computer sketch of the bottom box of the doghouse showing it is 2 feet high, 3 feet long, and 2 feet wide. The roof is not shown.
With the doghouse remodel complete, it was now time to move on to the next upgrade! LED lights!
A small computer board being held in front of the finished doghouse. There are five fuses, a micro controller, and power input and outputs on the surface of the board.
Materials
This is not an exhaustive list.
Note: I built the doghouse frame 13 years ago with limited skills, materials, and tools. Therefore, you will see a mismatch of lumber in the photos. However, if I were to start from scratch, the following is what I would recommend.
General
Outdoor Screws. Mainly 1-¼", but various sizes of ¾" to 3” were necessary.
Chad’s Tip: Stock up on various sizes of screws throughout the year! That way, you always have the right screws on hand to meet any job, and you never come up too short or too long!
Framing
2x4 – For the roof beam across the top
2x3 – For framing
2x2 – For supports and runners
Common boards
11/32” 2’x4’ Soffit plywood panels (Qty 8)
½” 2’x4’ plywood sheet (1 for base)
Aluminum flashing roll
Aluminum flashing sill
Gate hinges (6)
Roof/Siding
¼’ PVC Sheet (Qty 6 or 7) For siding and roof
½’ PVC Sheet (Qty 2) For trim (corners, roof ends)
Gloss Red Exterior (I used Behr Base 5340 Premium Plus Exterior Semi-Gloss custom match Home Depot Color Match CLRNT, AXL 0/40, KXL 0/27, RL 2/315, VL 0/1)
Gloss Black Exterior Paint
1” Paint Brush
Mini Roller (small nap)
Paint tray
Electrical
Wet location outlet box single gang (3)
Wet location outlet box double gang (1)
Switch
GFI outlet
3 outlets
Single gang outlet plates (3)
Switch and GFI plate
½” PVC wiring conduit
½” PVC wiring conduit elbows (6)
PVC Glue (same used for Roof/Siding)
Heavy duty 6-foot electrical plug pigtail (Outdoor ready)